
By the end of this article, you will have a website like this: https://www.tinotenda.gq/ 😀
Having an online presence can be beneficial to you in a lot of different ways. As I mentioned in a previous article, the best way to boost your online presence is to have your own personal website which will act as the first point of contact for anyone who searches your name on the interweb. In this article, I will show you how to create your own personal static website on Amazon S3 and CloudFront.
This guide is for the absolute beginner so I ignore a lot of technical stuff. If you just follow along exactly as I say, you will have a site up and running with HTTPS and a custom domain. However, if you are interested in the technical side of what’s going on in background, make sure to read the last section of this article “What’s Going On Here?” and feel free to post a comment for any specific questions you have.
What You Need to Know
At the end of this guide, you will have a static website with your own custom domain name with HTTPS too. To have a more pleasant experience with this guide, all you need are VERY basic HTML/CSS skills to modify the HTML template you are going to use. It will literally take you about an hour or less to learn the basic HTML/CSS skills you need to make changes to your template… so head over to YouTube and search for “HTML CSS tutorial“. Just to summarise this guide, we are going to:
- 1: Create a static HTML website using a free template you can find online.
- 2: Deploy your static website to Amazon S3.
- 3: Register a custom domain for your website for free using Freenom.
- 4: Register an SSL certificate for free using AWS Certificate Manager
- 5: Set up Amazon CloudFront so that your website supports HTTPS and to use your custom domain to access your website.
Step 1: Create a Static Site Using a Free HTML Template
HTML is the language used by websites and you can learn more about it here. If you know how to create a static site you can skip to Step 2.
One of my favorite sites for free HTML templates is html5up.net. This site has very good looking templates for personal websites and you can even preview them before downloading. The internet is filled with free HTML templates so take some time to search for one that resonates with your soul. Make sure to search for the keywords “free” and “html” like “free personal html website template“, “free portfolio website html5 template”, “free html templates for a freelance developer”, etc.
Once you have found your html template, you can download it onto your PC and start editing. This is where those basic HTML/CSS skills come in. I recommend a simple text editor like Sublime Text or Brackets. For very simple sites, all you will be doing is replacing images and editing the index.html to replace the text with your name and details. Once you are done, you should be able to browse your static site by opening the index.html file with your web browser.
Step 2: Deploy your static site on Amazon S3
Amazon S3 is a cloud storage service provided by Amazon Web Services (AWS). If you sign up with AWS, you get free access to a wide variety of AWS cloud services for the first 12 months and this includes 5 GB of free storage with S3. All you need to sign up is a credit card (they wont charge you) and you should be ready in a couple of minutes. You can sign up for AWS here.
Familiarise Yourself With Amazon S3
I recommend spending a few minutes familiarising yourself with Amazon S3 and the S3 console so please have a look at these videos:
Upload Your Static Site to Amazon S3
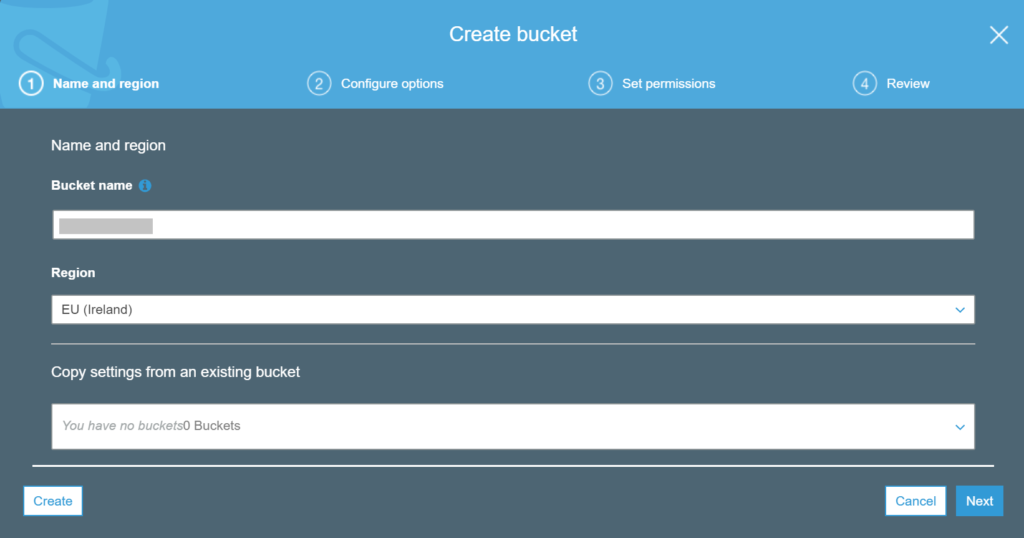
In this step, we are going to upload your static HTML website from your PC into an S3 bucket. So head over to your S3 Console and create a new bucket; On step 1, you can give your bucket a name and select “N. Virginia” as the region. It is recommended that you select the nearest region to you but if it is a new account, you might be restricted to a few regions so North Virginia will do just fine.
Leave the rest of the settings as defaults. After the bucket is created, upload your files to the bucket. You can select your files then drag-drop them into your bucket. Once uploaded, your index.html file should be at the root of the bucket as shown in the picture below:
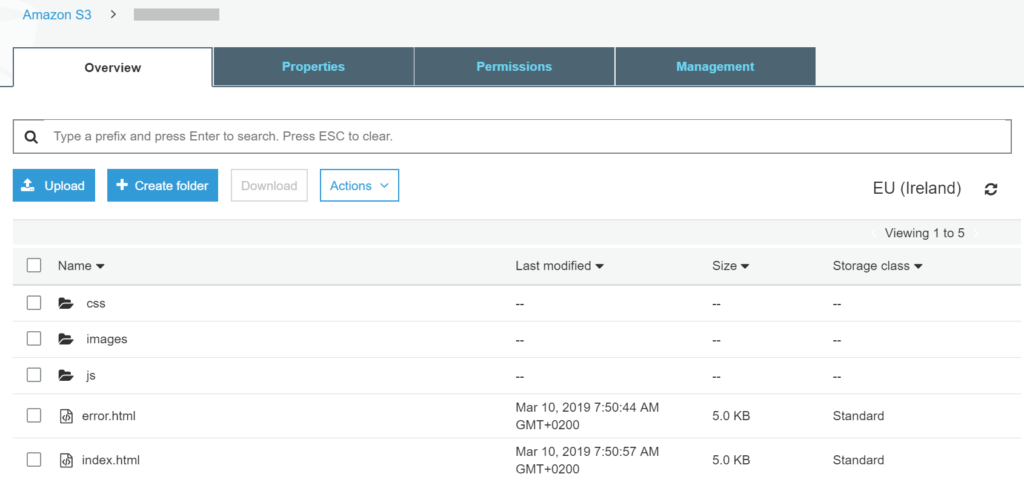
You will notice I have “error.html” as part of my website’s file which is a generic error page. S3 will serve this page when an error occurs on your website (404, 403, etc.)
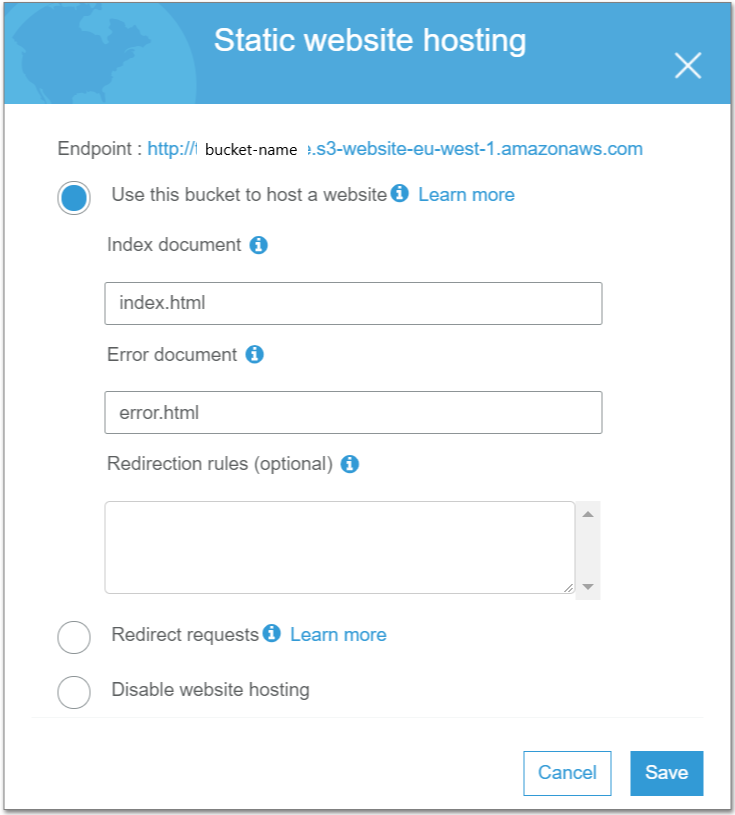
After uploading your files, go to the “Properties” section of your bucket and enable “Static Web Hosting” as shown below (enter “index.html” and “error.html” in the fields that pop up:
Great! Now we are done setting up our S3 bucket. Next we need to get a custom domain for our website.
Step 3: Register a Custom Domain for Your Website For Free
Right now you can actually modify some permissions on your S3 bucket to serve your website. But there’s two problems. First, you will have to use an ugly looking domain for you site in the form “http://
Freenom allows you to register domains for “tk”, “ga”, “ml”, “cf” and “gq” all for free. Head over to Freenom and register for a free domain. I registered for the domain “tinotenda.gq” for this tutorial. Once you have registered the domain, we are done with Freenom for now and we will be heading back to this website in the next step where we get an SSL certificate for you website.
Step 4: Register an SSL Certificate from AWS Certificate Manager for Free
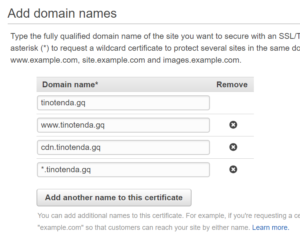
Remember I said AWS has tonnes of cloud services? Well AWS also has a service called AWS Certificate Manager which you can use to register for an SSL certificate…for free! Go to the ACM console and request for a new public certificate. Make sure you are in the “N. Virginia” region (at the top-right corner). This is very important otherwise you will face issues later on with CloudFront. Under “domains”, make sure to add the following domains (replace “tinotenda.gq” with your domain of course):
- tinotenda.gq
- cdn.tinotenda.gq
- www.tinotenda.gq
- *.tinotenda.gq
DNS Validation
On the next page make sure you select “DNS validation” and complete the request. On the completion page, you will see a couple of DNS records you need to create to validate your domain. You need to create these DNS records in your Freenom DNS settings. Go to your Freenom domain management section and select “Manage Domain” for your domain and then go to “Manage Freenom DNS”. Here is where you have to create the DNS records for ACM to validate your DNS… you will notice that the DNS validation records for “tinotenda.gq” and “*.tinotenda.gq” are the same but make sure you enter it once.
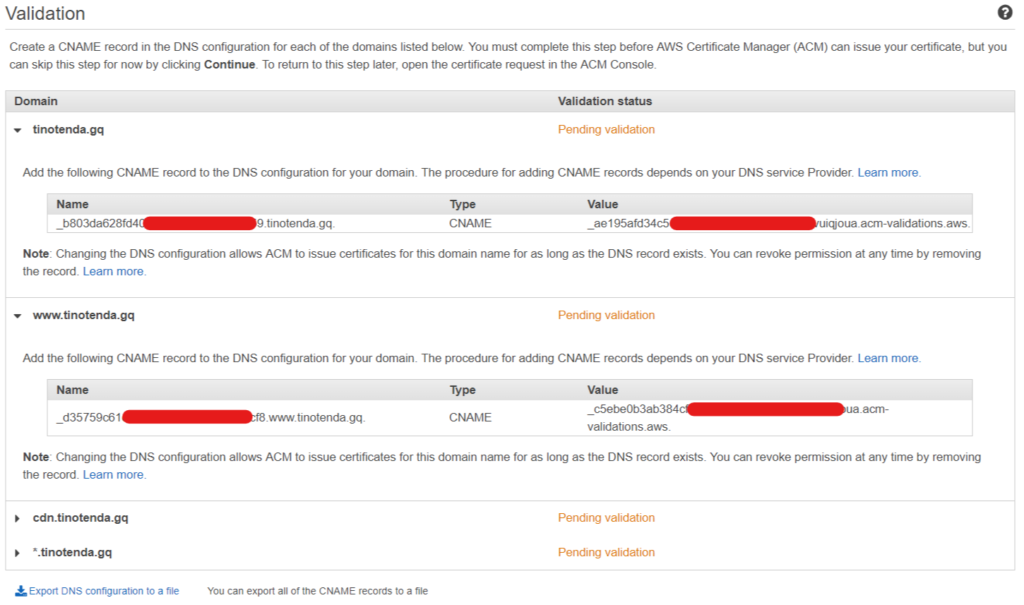
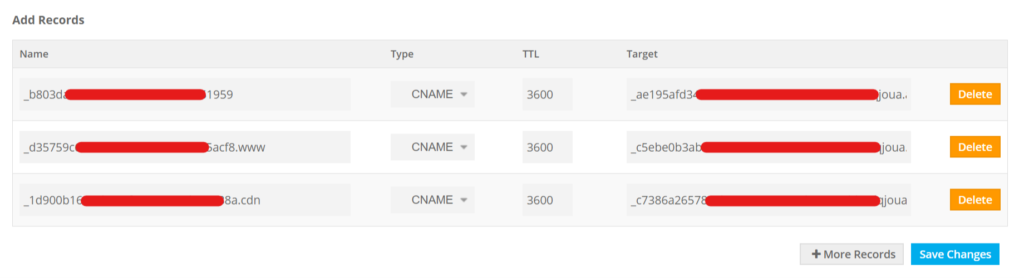
When entering your DNS records in Freenom, make sure to do the following (very important):
- Remove the “.tinotenda.gq” portion from “Name” field
- Remove the full-stop at the end of the Value/Target (after the “.validations.aws”)
After creating the DNS records in Freenom, save the entries and wait for ACM to pick them up and validate your domain. This can take anywhere from a few minutes to a couple of hours so in the meantime, let’s configure your CloudFront.
Step 5: Set up Amazon CloudFront to Enable Your Custom Domain to be Used for Your Website.
AWS also has a Content Distribution Network (CDN) service called Amazon CloudFront. For the first 12 months after registering with AWS, you get 50 GB data transfer and 2,000,000 requests per month, for free! We are going to use CloudFront as the only access point for your website. Let’s get started:
- Go to your CloudFront Console
- Choose Create Distribution.
- Select a Web distribution.
- For Origin Domain Name, you can choose your S3 bucket’s REST API endpoint from the drop-down menu.
- For “Restrict bucket access”, enter yes.
- For “Grant permissions on bucket” enter yes.
- Under “Default Cache Behaviour Settings“, for Viewer Protocol Policy, choose “Redirect HTTP to HTTPS“
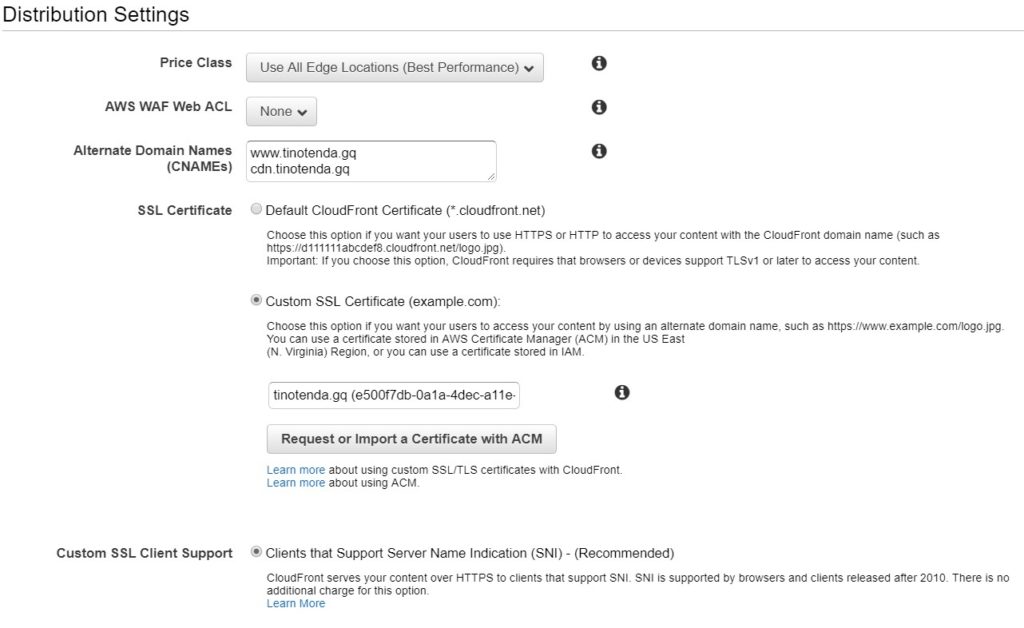
- Under “Distribution Settings“, for Alternate Domain Names (CNAMEs), type in “www.tinotenda.gq” and “cdn.tinotenda.gq” as shown below (replace my domain with yours of course)
- Enter “index.html” for “Default Root Object“
- For SSL Certificate, select Custom SSL Certificate. Then, choose the custom SSL certificate we created in step 4. If you don’t see it here, it is probably because (1) the domain validation is still in process or (2) you did not create your SSL certificate in the N. Virginia region.
- Leave everything else as defaults and select Create Distribution.
Configure Alternate CNAMEs
After you have selected “Create Distribution”, go back to your CloudFront console and you should see your distribution there with the status as “In Progress“. We need to retrieve the domain name for your distribution so that we can create DNS records “cdn.tinotenda.gq” and “www.tinotenda.gq” to point to your CloudFront distribution. Go to the “Distribution Settings” for your distribution and copy the “Domain Name” which will be in the form of “asdfghhjkl.cloudfront.net” as shown below:
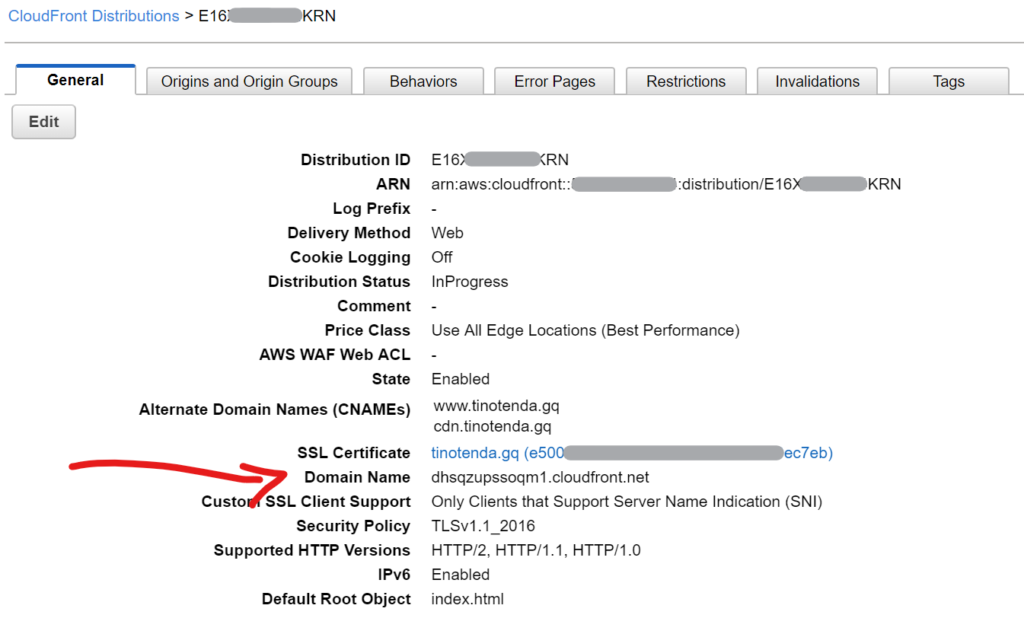
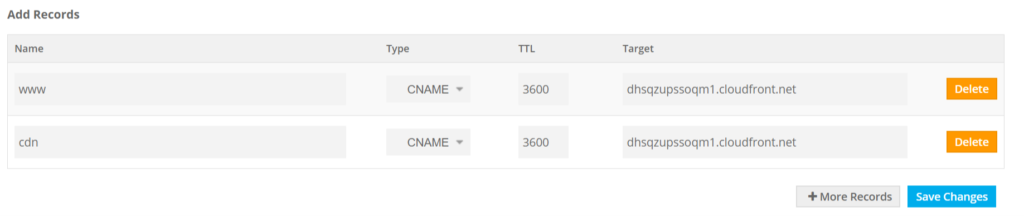
Once you have copied the Domain Name for your distribution, head over to the DNS Management section of your custom domain in Freenom and create CNAME records for “www” and “cdn” as shown below:
Done! That’s is. You should now be able to visit your website at www.tinotenda.gq or cdn.tiontenda.gq :D. Don’t forget to add this site to your CV!
What’s Going On Here?
Amazon S3 buckets can be configured to host static web content. This means that if you have a website that does not require any server side processing of requests, you can upload that site to your S3 bucket and deliver it like it was a website. This is not only limited to simple HTML sites, but even sites built on frontend frameworks like React and AngularJS.
Now because Amazon S3 can ONLY serve static content, this means you can ONLY have HTTP on your website since some server-side processing of requests is needed to encrypt/decrypt HTTPS traffic. This is where Amazon CloudFront comes in. CloudFront allows you to attach SSL certificates and you can then configure your distribution to encrypt traffic destined for your S3 bucket using HTTPS. You can even configure it to redirect HTTP traffic to HTTPS and you can also configure your Amazon S3 bucket to ONLY allow requests from your CloudFront distribution.
Why can’t I use an apex record to point to my site?
Using CloudFront with our site also allows us to use a custom domain for your S3 static site instead of the not so nice to look at S3 web endpoints. However, because your website’s endpoint is CloudFront, you cannot create an apex record that points to your CloudFront distribution. An apex record is the root DNS record of your domain without an subdomains ( tinotenda.gq ); so I can’t use tinotenda.gq to reach my website. This is because apex records can only be DNS A records and A records only allow IP addresses. A workaround for this is to use Amazon Route53 as your DNS service. Route 53 has a special record type called “Alias” which allows you to use a CNAME for your apex record. The only reason I opted not to use this is because it would cost an extra $0.50 😀
If you have any specific questions about anything in this tutorial feel free to drop a comment below!
Thanks for the post. Followed the steps and it worked!
One minor thing though, I had to include “example.com” in the Alternate Domain Names (CNAMEs) section (Step 5, number 8).
Until I did that, I could only reach my site on “www.example.com”, in case someone else has a similar problem.
Awesome article still!
[…] These unique skills can be as strange as fixing broken computers or even more common skills like conducting a cat choir. If you have a unique or rare skill, there is a market for it, you just need to do lots of research and marketing to exploit it. If you are a student, you can run a clothing repair business, computer repair, custom paint-jobs for bikes/cars/scooters, vegan snacks, etc Whatever you decide to jump into, do basic research, go around asking people, create surveys, etc to determine whether there is a demand for that service. If you are interesting… Read more »
Way more concise than a couple other tutorials I followed when doing this before. Thank you so much from being thorough.
Wow this is very useful article keep it up thanks..
[…] Space while more skilled individuals will prefer to use services like AWS. Here is an article on how to host your website FOR FREE on AWS with Amazon S3 and […]